At a Glance
Achieve perfectly flaky, crispy halwai-style samosas at home by focusing on key techniques. The secret lies in a well-prepared dough with the right fat ratio, adequate resting time for gluten relaxation, thin and even rolling, a cooled and dry filling, and precise oil temperature during frying. Avoid common pitfalls like overworking the dough or frying at incorrect temperatures to ensure a delicious, authentic snack.
Key Takeaways
The main points at a glance
- The flakiness of halwai-style samosas comes from the fat (ghee or oil) in the dough, which coats flour particles and creates layers when fried.
- Resting the dough for at least 30 minutes is crucial to relax gluten, making it easier to roll and promoting better puffing during frying.
- Roll the dough thinly and evenly to about 1/8 inch thickness for a delicate, crispy shell, and ensure seams are well-sealed to prevent bursting.
- Use a cooled and dry filling; hot or moist fillings can make the dough soggy or cause the samosas to burst during frying.
- Fry samosas at an ideal oil temperature of around 350°F (175°C) on medium heat, in batches, to ensure even cooking and prevent greasiness or a raw interior.
- Avoid common mistakes like using too little fat, not resting the dough, frying at the wrong temperature, or overfilling to achieve the perfect texture and taste.
The Secret to Flaky Samosas: It’s All in the Dough
The foundation of any great samosa is the dough. Halwai-style samosas use a simple dough made from all-purpose flour, also known as maida, along with a little oil or ghee, salt, and water. But the magic isn’t in the ingredients alone. It’s in how you handle them.
The key to flakiness is the fat you add to the dough. In traditional halwai recipes, the fat is usually ghee or oil. The fat coats the flour particles and prevents too much gluten from forming. Gluten is what makes bread chewy. For samosas, you want the opposite: a tender, flaky texture. The fat creates small pockets in the dough. When the samosa hits hot oil, those pockets expand and create layers. That’s what gives you the light, crispy crust.
Another secret is the ratio of fat to flour. Most halwai-style recipes use about 1/4 cup of oil or ghee for every 2 cups of flour. This is enough to make the dough rich without making it greasy. Some home cooks skip the fat or use too little, and that’s when samosas turn out hard and cracker-like.
You also need to use the right kind of flour. All-purpose flour works best because it has a moderate protein content. Too much protein, like in bread flour, makes the dough tough. Too little, like in cake flour, makes it fragile. All-purpose flour gives you the perfect balance.
Step 1: Prepare the Perfect Dough – Ingredients and Technique
Here is what you need for the dough:
- 2 cups all-purpose flour (maida)
- 1/4 cup oil or ghee (at room temperature)
- 1/2 teaspoon salt
- About 1/2 cup water (or a little more, as needed)
Start by mixing the flour and salt in a large bowl. Add the oil or ghee. Use your fingers to rub the fat into the flour until it looks like coarse crumbs. This step is important. You want every bit of flour to be coated with fat. It’s the same technique you use when making pie crust. The fat creates the flakiness.
Now add water little by little. Use just enough to bring the dough together. You don’t want it sticky. You want it firm but pliable. A good test is to press the dough with your finger. It should hold together without cracking at the edges. If it cracks, add a few drops more water. If it’s sticky, add a little more flour.
Knead the dough for about 5 minutes. It should be smooth and not too soft. Cover it with a damp cloth or plastic wrap and let it rest. We’ll talk about resting in the next step.
Why does the fat have to be at room temperature? Cold fat doesn’t mix well with flour. It creates uneven pockets. Room temperature fat blends more smoothly and gives you a uniform dough. That means even layers when you fry.
Step 2: Resting the Dough – The Key to Flakiness
Resting the dough is not optional. It’s a must. After you knead the dough, let it sit for at least 30 minutes. An hour is even better. Some halwais rest the dough for a full 2 hours.
Why does resting matter? When you knead dough, you develop gluten. Gluten gives structure, but too much makes the dough tough. Resting allows the gluten to relax. The dough becomes easier to roll out. It also helps the fat distribute evenly throughout the dough.
During the rest, the flour absorbs the water fully. This makes the dough more pliable. When you roll it later, it won’t shrink back. The rested dough also puffs up better during frying, creating those beautiful layers.
Here’s a tip: cover the dough with a damp cloth or plastic wrap. This prevents a dry skin from forming on the surface. If the dough dries out, it will crack when you try to roll it. You want it soft and supple.
After resting, the dough should feel smooth and slightly springy. Don’t skip this step. It makes all the difference between a tough samosa and a flaky one.
Step 3: Rolling and Shaping – Tips for Even Layers
Now that the dough is rested, it’s time to roll it out. Divide the dough into small balls, about the size of a golf ball. Keep the ones you’re not using covered so they don’t dry out.
Roll each ball into a thin circle. The circle should be about 6 inches across. Roll evenly, from the center outward. You want the thickness to be uniform. If some parts are thinner than others, those thin spots may tear when you fry.
Once you have a circle, cut it in half. Each half will make one samosa. Take one half and form it into a cone shape. How? Fold the straight edge to form a cone, overlapping the edges slightly. Seal the seam with a little water. The cone should have a pointed end and an open top.
Hold the cone in your hand. Fill it about three-quarters full with your prepared filling. Don’t overfill. Leave some space at the top so you can seal it. Now press the top edges together to close the cone. Pinch the seam firmly to seal. You can also twist the top for a decorative finish.
Repeat with the remaining dough and filling. Place the shaped samosas on a tray lined with a dry cloth. Cover them with a damp cloth to prevent drying out while you prepare to fry.
A common mistake is rolling the dough too thick. Thick dough leads to hard, doughy samosas that don’t cook through. Thin dough gives you that delicate, crispy shell. But don’t make it paper thin either, or it might tear. Aim for about 1/8 inch thickness.
Another tip: use a little oil on your rolling surface. Flour can make the dough dry. Oil keeps it pliable.
Step 4: Filling Your Samosas – Classic Aloo Filling
The classic halwai-style samosa filling is aloo, or spiced potatoes. It’s simple, affordable, and delicious. But you can also use other fillings like keema (minced meat) or paneer. The technique for the dough and frying stays the same.
For the aloo filling, you’ll need:
- 4 medium potatoes, boiled and mashed
- 1 teaspoon cumin seeds
- 1 teaspoon fennel seeds
- 1 green chili, finely chopped (optional)
- 1/2 teaspoon red chili powder
- 1/2 teaspoon garam masala
- 1/2 teaspoon dry mango powder (amchur)
- Salt to taste
- 1 tablespoon oil
- A handful of chopped fresh coriander
Heat the oil in a pan. Add the cumin and fennel seeds. Let them sizzle for a few seconds. Add the green chili, then the mashed potatoes. Add the spices and salt. Mix well. Cook for 2-3 minutes, stirring. Turn off the heat and add the coriander. Let the filling cool completely before using.
Why does the filling need to cool? If you put hot filling into the dough, it can make the dough soggy. The steam can also cause the samosas to burst during frying. Always use cooled filling.
The filling should be dry, not wet. Excess moisture makes the samosas soggy from the inside. If your potato filling is too moist, cook it a little longer to dry it out.
Step 5: Frying at the Right Temperature – Avoid Greasy or Hard Samosas
Frying is where many home cooks go wrong. The temperature of the oil is crucial. If the oil is too hot, the samosas brown too quickly on the outside while remaining raw inside. If the oil is too cool, the samosas absorb too much oil and become greasy.
The ideal frying temperature for samosas is around 350°F (175°C). At this temperature, the samosas cook evenly. The outer layer crisps up without burning. The inside cooks through properly.
How do you know when the oil is ready? You can use a kitchen thermometer. If you don’t have one, drop a small piece of dough into the oil. It should sizzle and rise to the surface right away. If it sinks without sizzling, the oil is too cold. If it browns immediately, the oil is too hot.
Another tip: fry the samosas on medium heat. Not high. Medium heat allows the heat to penetrate the thickest part of the samosa. It also gives the layers time to separate and become flaky.
Don’t overcrowd the pan. Fry in batches. If you add too many samosas at once, the oil temperature drops. That leads to greasy samosas. Leave enough space so each samosa can float freely.
Fry the samosas for about 4-5 minutes per side. They should turn golden brown. Flip them gently with a slotted spoon. Don’t poke them or they might break.
Once done, remove them to a paper towel-lined plate. This absorbs any excess oil. Let them cool for a minute before serving. They are best eaten fresh and hot.
Some people like to double-fry for extra crispiness. After the first fry, let the samosas cool completely. Then fry them again for 1-2 minutes. This makes them even crunchier. Halwais often do this for samosas that will be served later.
Common Mistakes and How to Fix Them
Even with good instructions, things can go wrong. Here are the most common mistakes and how to fix them.
Mistake 1: The dough is too hard. This usually happens when you add too little fat or too much water. The dough becomes stiff and difficult to roll. Fix: Add a little more oil or ghee next time. Also, make sure you rest the dough long enough.
Mistake 2: The samosas turn out greasy. The oil temperature is too low. The samosas sit in the oil and soak it up like a sponge. Fix: Heat the oil to 350°F before adding the samosas. Use a thermometer to be sure.
Mistake 3: The samosas burst open during frying. This can happen if the filling is too moist or if the seams are not sealed properly. Fix: Make sure the filling is completely cooled and dry. Seal the edges with a little water and press firmly. Also, avoid overfilling.
Mistake 4: The samosas are pale and doughy. The oil is too hot. The outside browns too quickly, and the inside stays raw. Fix: Lower the heat. Fry at medium heat. If the samosas are browning too fast, remove them and lower the temperature.
Mistake 5: The layers are not flaky. The dough might have too much gluten or not enough resting time. Fix: Use the right amount of fat. Rest the dough for at least 30 minutes. Also, roll the dough evenly and not too thick.
Mistake 6: The samosas taste bland. The filling needs more seasoning. Fix: Taste the filling before using it. It should be slightly spicier than you want because the dough will balance it out. Add more salt, spices, or herbs as needed.
If you make a mistake, don’t give up. Each batch teaches you something. With practice, you’ll get better.
Mastering the Halwai-Style Samosa at Home
Now you have all the tips you need to make perfect halwai-style samosas. The secret lies in the dough preparation, adequate resting time, and precise frying temperature. It’s not complicated, but it does require attention to detail.
Start with the classic aloo filling. It’s the most forgiving and the most loved. Once you master that, you can experiment with keema, paneer, or even a sweet filling for dessert samosas.
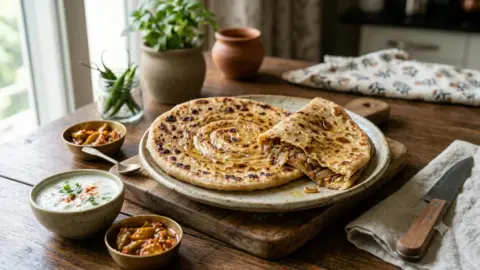
Remember, halwai-style samosas are known for their thin, crispy shell with many layers. This method differs from other regional styles, which might be larger or have thicker dough.
Don’t be afraid to adjust the spices in the filling to suit your taste. While baking is an option for a healthier version, frying is essential for that authentic, crispy texture.
One last tip: serve your samosas with mint chutney or tamarind chutney. They complement the flavors perfectly. A cup of hot chai on the side makes it a complete evening snack.
So go ahead. Try this halwai-style recipe tonight. Your family will love you for it. And you’ll feel proud knowing you made those crispy, flaky samosas with your own hands.
Happy cooking!
Frequently Asked Questions
What makes halwai-style samosas so flaky?
The flakiness comes from the fat, usually ghee or oil, added to the dough. This fat coats the flour, preventing excessive gluten development and creating small pockets. When fried, these pockets expand, forming the characteristic light and crispy layers.
Why is resting the samosa dough important?
Resting the dough allows the gluten that developed during kneading to relax. This makes the dough much easier to roll out thinly and evenly without shrinking back. It also helps the fat distribute better, contributing to a more tender and flaky crust.
What is the ideal oil temperature for frying samosas?
The ideal temperature for frying samosas is around 350°F (175°C). This temperature allows the samosas to cook through evenly, crisp up nicely on the outside, and develop flaky layers without burning too quickly or absorbing too much oil.
How can I prevent my samosas from becoming greasy?
To prevent greasy samosas, ensure your oil is at the correct temperature (around 350°F or 175°C) before adding them. Also, avoid overcrowding the pan, as this lowers the oil temperature and causes the samosas to absorb more oil. Fry in batches and remove them once golden brown.
What causes samosas to burst during frying?
Samosas can burst if the filling is too moist or hot, or if the seams are not sealed properly. Ensure your filling is completely cooled and dry before stuffing. Press the edges firmly together with a little water to create a strong seal, and avoid overfilling the samosa.
Can I use whole wheat flour for samosa dough?
While all-purpose flour (maida) is recommended for its moderate protein content, you can experiment with whole wheat flour. However, whole wheat flour has more gluten, which can result in a tougher texture. You might need to adjust the fat and water ratios and ensure adequate resting time.
How can I make the samosa filling less watery?
If your potato filling is too moist, cook it for a few extra minutes after adding the spices to help evaporate excess moisture. Ensure the filling is completely cooled before stuffing the samosas. Excess moisture is a common cause of soggy samosas and potential bursting.
References
- Make Flaky Halwai-Style Samosa At Home With These Tips – Original report (NDTV Health)
- Watch: Prepare Halwai-Style Aloo Samosa At Home For Evening Snacking – NDTV Food – NDTV Food
- Watch: Prepare Halwai-Style Aloo Samosa At Home For Evening Snacking – NDTV Food – This related article, found via Google News RSS, suggests a focus on aloo (potato) samosas for evening snacking, but its full text was not available for detailed analysis.