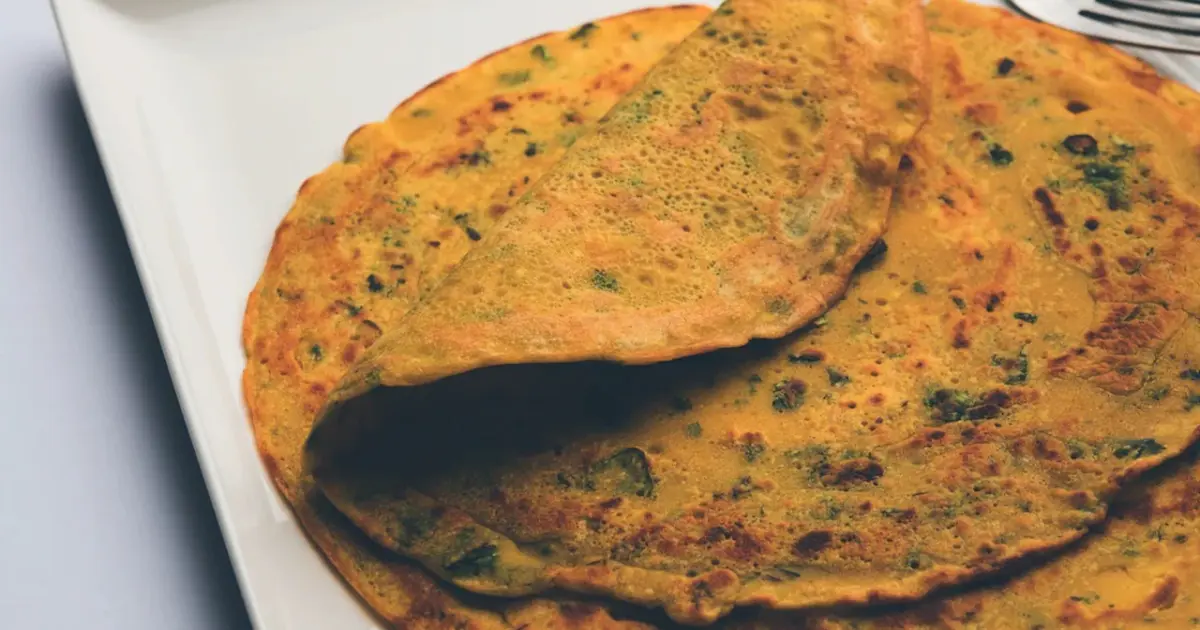
At a Glance
Besan chilla often breaks while flipping due to its gluten-free nature. To prevent this, ensure your batter has the right consistency, similar to heavy cream, and let it rest for 10-15 minutes. Using a non-stick pan on medium heat, adequate oil, and a confident flipping motion with a thin spatula are key to achieving perfect, unbroken chillas every time.
Key Takeaways
The main points at a glance
- Besan chilla breaks because gram flour lacks gluten, making it naturally fragile.
- Achieve the correct batter consistency: like heavy cream or runny yogurt, not too thin or thick.
- Resting the batter for 10-15 minutes improves cohesion and reduces breakage.
- Adding binders like rice flour or cornflour strengthens the chilla.
- Use a non-stick pan on medium heat with sufficient oil for easy flipping.
- Flip with a single, confident motion using a thin spatula once edges lift.
Common Reasons Your Besan Chilla Breaks While Flipping
It is a common kitchen frustration: you are ready to flip your golden besan chilla, but it cracks and breaks apart. This happens because besan, or gram flour, lacks gluten. Gluten provides elasticity in wheat-based doughs, making chillas naturally more fragile. Several factors contribute to breakage, including batter consistency, pan heat, and flipping technique.
Achieving the Perfect Besan Chilla Batter Consistency
The most crucial step for a break-free besan chilla is getting the batter consistency right. Aim for a texture similar to heavy cream or runny yogurt. It should pour easily but not be watery. If the batter resembles milk, it is too thin. If it is a thick paste, it is too thick.
A good test is to dip a spoon into the batter. It should coat the spoon evenly and drip off in a steady ribbon. If it slides off too thinly, add a bit more besan. If it doesn’t drip, add a splash of water.
Resting the Batter for Better Cohesion
Allowing the batter to rest for at least 10 to 15 minutes after mixing is a secret weapon. This resting period lets the gram flour absorb water, leading to a smoother, more cohesive batter that holds together better.
Adding Binders to Strengthen the Chilla
Incorporating a binding ingredient can significantly prevent chillas from breaking. Adding about a tablespoon of rice flour per cup of besan provides extra structure without altering the taste. Cornflour or even extra chickpea flour can also help hold the chilla together.
Optimizing Your Pan and Heat for Easy Flipping
Using the right pan and maintaining the correct heat are essential for successful chilla making. A non-stick pan is highly recommended for beginners as it makes releasing the chilla much easier.
Finding the Ideal Pan Temperature
Cook your chilla on medium heat. If the pan is too hot, the outside will burn before the inside sets, making the chilla brittle and prone to cracking. Too low a heat will cause the chilla to stick to the pan.
A simple test for heat: sprinkle a few drops of water on the pan. They should sizzle and evaporate quickly. If they dance around, the pan is too cool. If they vanish instantly and smoke appears, it is too hot.
Using Oil or Ghee for a Non-Stick Surface
Do not skimp on oil or ghee. Lightly grease the pan before pouring the batter. Drizzling a little oil around the edges of the chilla as it cooks also helps it release easily from the pan. The chilla is ready to flip when the edges begin to lift away from the sides.
Mastering the Flip Technique for a Perfect Chilla
Flipping a besan chilla requires a smooth, confident motion. Wait until the edges are golden brown and the top surface appears set. Use a thin, flexible spatula and slide it completely under the chilla, ensuring it’s not stuck anywhere.
Lift the spatula quickly and smoothly, tilting the pan slightly. Flip the chilla over in one decisive motion. Hesitation can lead to breakage. If you are nervous, practice with a smaller portion or use a second spatula to guide it.
Adding Paneer and Vegetables Without Causing Breaks
To add paneer or vegetables to your besan chilla, prepare them by grating paneer finely and chopping vegetables into very small pieces. This prevents the chilla from becoming lumpy and weak.
Gently mix these add-ins into the batter, being careful not to overmix. If the batter becomes too thick, add a little water. A more effective method is to sprinkle the add-ins directly onto the batter once it’s spread in the pan, pressing them down lightly.
Quick Fixes for Common Besan Chilla Problems
Even with the best preparation, chillas can sometimes break. If a chilla cracks during flipping, gently press the pieces back together with a spatula; the heat will help them fuse. If it splits into two, cook each half separately.
If a chilla sticks, slide a bit more oil or ghee around the edges and let it cook for another 30 seconds before trying to flip again. If your batter is too thin, add more besan and let it rest. If it’s too thick, add a splash of water.
Your Essential Besan Chilla Checklist
- Ensure batter consistency is like heavy cream or runny yogurt.
- Rest the batter for 10-15 minutes after mixing.
- Consider adding a tablespoon of rice flour or cornflour as a binder.
- Use a non-stick pan for easier handling.
- Cook on medium heat, testing with a water drop.
- Grease the pan adequately with oil or ghee.
- Wait for the edges to lift before attempting to flip.
- Use a thin, flexible spatula and slide it fully underneath.
- Flip with one smooth, confident motion.
- For add-ins, sprinkle them on top or chop them very finely.
Frequently Asked Questions
Why does my besan chilla keep breaking when I flip it?
Besan chilla breaks because gram flour lacks gluten, which provides elasticity in wheat-based batters. Common causes include batter that is too thin or too thick, incorrect pan heat, and hesitant flipping techniques. Ensuring the right batter consistency and cooking temperature are crucial.
What is the ideal consistency for besan chilla batter?
The ideal consistency for besan chilla batter is like heavy cream or runny yogurt. It should pour smoothly from a spoon in a continuous stream but not be watery. If it's too thin, it tears easily; if too thick, it becomes stiff and cracks.
How long should I rest besan chilla batter?
Resting the batter for at least 10 to 15 minutes after mixing is highly recommended. This allows the gram flour to absorb water, resulting in a smoother, more cohesive batter that holds together better when cooking and flipping.
Can I add rice flour to besan chilla batter to prevent breaking?
Yes, adding a small amount of rice flour, about one tablespoon per cup of besan, can significantly help prevent besan chilla from breaking. Rice flour acts as a binder, giving the chilla extra structure without affecting its taste.
What is the best pan to use for making besan chilla?
A non-stick pan is the most forgiving and recommended for making besan chilla, especially for beginners. It helps ensure the chilla releases easily without sticking or tearing. Cast iron or stainless steel pans can work but require careful seasoning and adequate oil.
How do I know when my besan chilla is ready to flip?
Your besan chilla is ready to flip when the edges start to look golden brown and lift away from the pan. The top surface should appear set, not wet or runny. Gently sliding a thin spatula underneath to check for sticking is also a good indicator.
What is the best way to flip a besan chilla?
Use a thin, flexible spatula and slide it completely under the chilla. Lift the spatula smoothly and decisively in one motion, tilting the pan slightly if needed. Avoid hesitant movements, as a confident flip is key to preventing breakage.
References
- Why Your Besan Chilla Breaks While Flipping And How To Fix It – Original report (NDTV Health)
- Sooryavanshi's fiery clash overshadows India A's Super Over loss – MSN – Unrelated article about a cricket match; no useful information for the besan chilla topic.
- The Devil Wears Prada 2 Actor Stanley Tucci Shares Easy Frittata Recipe, Internet Has Mixed Reaction – NDTV Food – Unrelated recipe article about a frittata; no cross-reference for besan chilla.
- Child Suffers Kidney Failure After Eating Kofta, Father Sues The Restaurant – NDTV Food – Unrelated news about food safety; no connection to besan chilla.
- When Turkiye Came To Gurugram: Inside The Culinary Diplomacy Event That Shared History On The Same Table – NDTV Food – Unrelated article about a diplomatic food event; not relevant.
- “Will Steal Your Salad”: Internet Reacts To Orry’s Nature-Themed Artwork – NDTV Food – NDTV Food